Apache Certificate Installation on Windows (XAMPP)
The Apache web server is inextricably linked to Linux, but you can also use it on Windows with the XAMPP package. It will install Apache (hereinafter PHP, MySQL, Perl) on your Windows station and you can start a web server similar to Linux. However, if you have no previous experience with Apache administration, the setup might not be easy for you. Our instructions will help you to find your way around XAMPP and easily set up a certificate for Apache.
Basic orientation in the XAMPP environment
XAMPP simplifies the administration of the server and individual components using a control panel which combines the control of individual services. In the "original" on Linux, control is divided (separate services). To control components on a Linux server, you need a terminal (or SSH) and knowledge of the appropriate commands. Thanks to XAMPP, you have everything in one place and can control the components with buttons in the graphical interface.
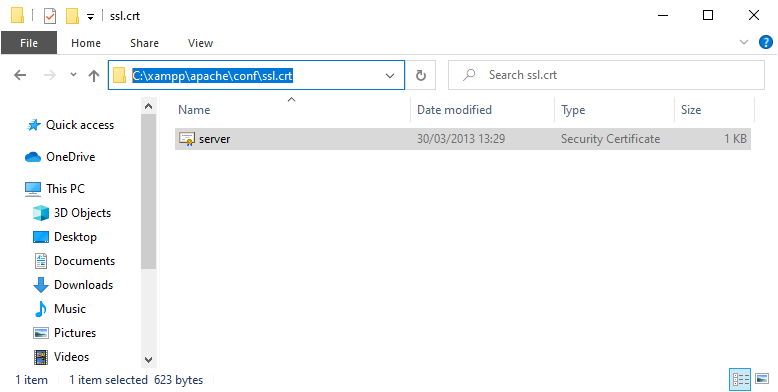
If you install XAMPP by default, you will find it in the C:xampp folder. To install the certificates, you will need to find the C:xamppapacheconf folder, where the keys are divided into three folders:
- ssl.crt
- ssl.csr
- ssl.key
As the name of the folders suggests, you have to store certificates for the domain in the .crt folder and then the private key (which you get in SSLmarket) in the .key folder. The CSR folder is irrelevant because you will not do CSR as a certificate request.
Obtaining a certificate and importing it to the server
Obtaining a certificate in SSLmarket is a breeze. For later installation, we recommend creating a CSR in order (or later in our administration) and saving the private key for later use. The certificate will be issued upon request and the speed depends on the type of verification. After release, you will have a file with a private key and a certificate with its intermediate certificate (from the issuing CA) in a second separate file.
We strongly recommend that you name the file with the private key and certificate according to the domain the certificate is issued for.
These two files (certificate and private key) need to be copied into the given folder in the location C:xamppapacheconf (you can do it easily via the file manager). The private key should go into the ssl.key folder, the certificate into the ssl.crt folder; the file extension doesn't matter, but copying alone is not enough. You need to tell Apache which certificate to use and where to find these files. We will do this by modifying the next step’s configuration.
Vhost configuration
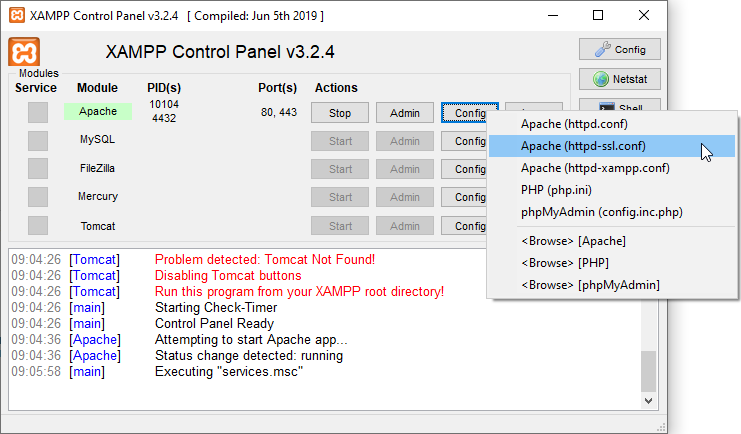
Apache is configured by editing a configuration file that is a text file, so you can use any text editor (Notepad). In the XAMPP panel window, click Config, and then select httpd-ssl.conf. This file is used to set up a secure version of the site (HTTPS), as SSL suggests in the name, and a separate file (which we will not edit) for the non-secure version (HTTP).
Locate the SSLCertificateFile and SSLCertificateKeyFile directives in the file. Rename the files referenced in the directives according to the certificate and private key’s file names that you uploaded to the folders.
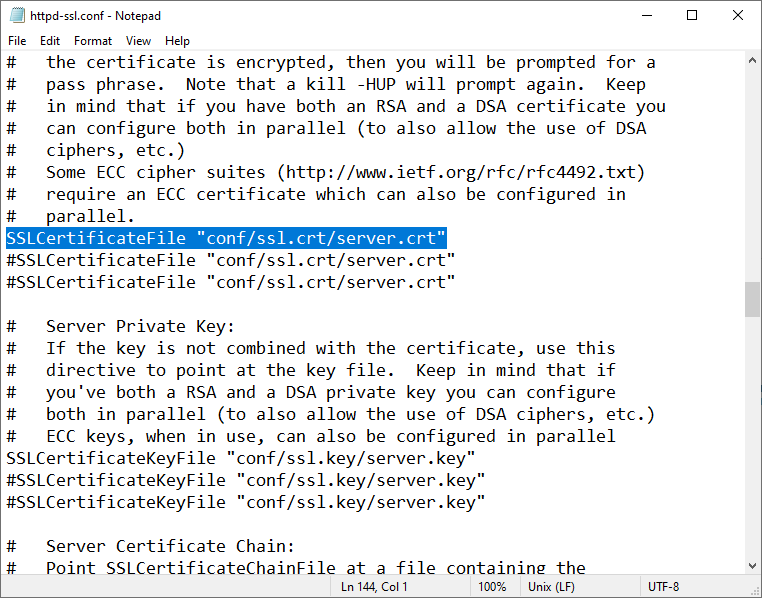
The second option is to directly edit the contents of these two files, server.crt and server.key. You can open them in Notepad and change their contents because the keys are in Base64 text format, so just Ctrl + C and Ctrl + V and insert new text.
Finish and restart
After completing the previous steps, restart your Apache server using the Stop and Start buttons. Assuming the previous configuration was correct, the server will boot and you can use HTTPS with a trusted certificate on the given site.
If you cannot start Apache, look in the error log (Logs button and error.log). The only possible cause is a private key that does not match the certificate. Make sure you have copied the correct private key and certificate to the correct folder

We are sorry that you did not find the required information here.
Please help us to improve this article. Write us what you have expected and not found out.